05.04.2023 - 0.0.2023 (Week 1 - Week)
Devina Angeline Wiratama / 0350824
3D Modeling / Bachelor of Design (Hons) in Creative Media
Exercises
3D Modeling / Bachelor of Design (Hons) in Creative Media
Exercises
<iframe src="https://drive.google.com/file/d/1jYLWBsUYlkg0-1lQEkukSNc3J8GBb6Ge/preview" width="640" height="480" allow="autoplay"></iframe>
Weekly:
Week 1-4 / Exercises
- Exercises/ projects due each week
- Introduce the 3D polygonal modelling tools and techniques
- Produce a good polygonal surface and optimized for subdivision modelling
- Will be presented using the rudimentary of Open GL material and rendering preview
- Submission: Rendered in PNG (OpenGL rendering) and Online posts.
Week 5-7 / Project 1: Hard Surface 3D Modelling
- ok
Week 8-10 / Project 2: Theme-Based Scene Modelling
- ok
Week 11-14 / Final Project & E-Portfolio
- ok
LECTURES
WEEK 1 / 03.04.2022
Subject Outline & Expectations
Module Information Briefing and Introduction to Blender.
Mr Kamal started the class with a short explanation about 3D Modeling. In every class, our demonstration will be recorded online. For the workflow of 3D:
- Pre-production
- Production
(3D Modeling - material, texture, rigging, animation, lighting, rendering)
- Post-production
MIB
In this class, we will only learn production. The software that we will use is Blender 3.3. Next, Mr Kamal explained our MIB (exercises and projects). Outline:
Exercises (W1-W4)
1. W2: Box Modeling (ex 1)
2. W3: Cylindrical Modeling (ex 2)
3. W4: Plane Modeling: Simple car modelling (ex 3/ edge loop)
Project 1 (W5-W7)
: Start by box, cylinder, plane, and boolean.
4. W5: Boolean Modeling: Modeling hard surface (project 1)
- Add
- Subtract
- Different
5. W6: learn material, camera, lighting, and rendering.
6. W7: UV unwrapping
Project 2 (W8-W9)
: Theme-based scene modelling.
7. W8: Painter techniques
8. W9: Character modeling
Final Project (W10-W14)
: Character model.
- Techniques: box, cylinder, plane
- Put material, texture, lighting, and rendering
- Learn Topology (the hardest)
9. W10: Character rigging
10. W11-W14: Finishing
Introduction to Blender
After finishing explaining MIB, we moved on to the introduction to Blender.
1. Rotate
- pressing the scroll mouse
2. Pan/ track view
- shift + press scroll
3. Zoom
- scroll
- ctrl + press scroll
4. Add workspace
- drag cursor until + sign appear
5. Select and transform
- move/ translate
- rotate
- scale
- (T) move, scale, rotate panels // left side
- (N) properties panels \\ right side
In properties panels, can make the object (0, 0, 0)
Shortcut:
Fig. / Shortcut Select and Transform, Week 1 (05.04.2023)
6. Pivot Point
: Represent the point for transformation. Default: object is in the centre (ex: door)


Fig. / Pivot Point, Week 1 (05.04.2023)
: To adjust the size when its rotated already (Move and Scale)

Fig. / Transform Orientation, Week 1 (05.04.2023)
8. Add Object

Fig. / Add Object, Week 1 (05.04.2023)

Fig. / Duplicate Object, Week 1 (05.04.2023)
- Rename: double click
- Group/ Collection: click new collection (top corner right)
- Select all in the group: click right on the collection layer - select the object.
11. Single view to Quad view
Ctrl + Alt + Q
To return or make it bigger:
N - Quad view - untick the Lock Rotation

Fig. / Quad view, Week 1 (05.04.2023)
12. View
: X-ray, solid, material, and render preview

Fig. / View, Week 1 (05.04.2023)
13. Parent
Select everything (all objects), the last one will be the parent.
'Object' - 'Parent' - 'Object'


Next:
Looking for Ideas for Exercise 1 next week.
WEEK 2 / 12.04.2022
Exercise 1: Modeling from Primitives Objects
Introduction to Polygonal Modeling. Box modelling techniques and tools.
Mr Kamal started the class by reviewing last week's lesson. He also added some information.
1. Pinpoint
- Temporary pinpoint
- Coordmet to add object

Fig. / Pinpoint, Week 2 (12.04.2023)
2. Snap

Fig. / Snap, Week 2 (12.04.2023)
3. Find the cursor
- Shift + S

Fig. / Cursor, Week 2 (12.04.2023)
4. Parent
- Select all the objects (the last one will be the parent)
- Ctrl + P
- Unparent - (in layers) hold shift + drag
5. Mirror
- Change the transform pivot point - choose 3D cursor - Shift + M - x, y, z

Fig. / 3D Cursor, Week 2 (12.04.2023)
6. Colour
- +new - viewport

Fig. / Colour, Week 2 (12.04.2023)
7. Add simple modifier
- Not only simple modifier, but also array, and more.

Fig. / Modifier, Week 2 (12.04.2023)
8. SmoothChoose normal - Smooth

Fig. / Smooth, Week 2 (12.04.2023)
9. Render
View - Viewport render image - image - save as


But these two are not for my exercise. I want to make something else that I sketched already.


Fill

Tires


To make a smooth looking.


Next the second demo, karambit.


Try to imitate using boxes.


First, we used a cylinder and applied an array and simple modifier, but it didn't come out well (the right side). Then I tried using half sphere and it looks good (two from the right side), but Mr Kamal told me to not use the edit mode first, to focus on object mode. Then he taught me to use a sphere, apply simple modifiers and rigging (add - empty - plain axes) (two from the left side). Then I tried to make again using multiply simple deform and it come out not bad (the left side). I decided to use the last method.


Then I colour it and put 2 street lamps. I wanted to make it transparent, but somehow it didn't work. oh well:'

Then I put 3 point lamps. 2 inside the street lamp, and one above the mushrooms (as a moonlight). I change the colour of street lights to yellowish.

I put the snowman there also. Here is the result. It looks cute <3


Bottom view

Side View

Behind View

Top View

I applied a new technique, Boolean (inside modifier). The purpose is to cut the object so that can have a see-through view.


Here is the result.

Then after the class, I showed it to Mr Kamal. Mr Kamal said can repair the lens and the paper so that not looked too stiff. He showed me how to make it. For the lens, can just cut the sphere and put a modifier. For the paper, also can apply modifier stretch, but before that need to apply the loop cut and scale all 0.

Then I did the revision again.


Then I change the blue glass texture to more see-through. So that when it is overlapping, can see it well.


Make it smooth.

The black thing. I noticed that there is an unsmooth surface.

I made it smooth.

Then put the button

Combine everything

Put colour

Set camera and lighting. Then render.


Then Mr Kamal briefs us about our first exercise.
WEEK 3 / 19.04.2022
Exercise 2: Cylindrical Modelling
Understand Polygon Modelling. Cylindrical modelling techniques and tools
We learned about:
- Introduction to Polygon Modelling
- Polygon edit mode (Vertex, Edge, Face, Normal)
- Polygon surface (Triangle, Quad, N-Gon)
- Basic workflow
- Cylindrical modelling technique
- Edit Mesh Tool - Extrude, Inset, Bevel, Loop cut
- Edge Loop
- Modifier Tool - Smooth
Here are the notes that I get today:
- Press 'Tab' to change object mode to edit mode.
- Vertex, edge, and face

Fig. / Vertex, edge, face, Week 3 (19.04.2023)
- Smooth
1. Normal: Normal - auto smooth
2. Modifier (Ctrl + 0/ 1/ 2): Add modifier - subdivision (levels viewport can't be more than 2)

Fig. / Smooth Modifier, Week 3 (19.04.2023)
3. Mouse: right click - smooth (back original - flat)
- Camera (Ctrl + Alt + 0): view - view lock - lock - a camera to view (v)

Fig. / Camera, Week 3 (19.04.2023)
WEEK 4 / 26.04.2022
Exercise 3: Simple car modelling
Understand surface topology. Place modelling techniques and tools.
This week, Mr Kamal gave us feedback and straight away started the tutorial.
WEEK 5 / 03.05.2022
Continuing Exercise 3
Mr Kamal started by reviewing again some of the shortcuts. I learned something new also.
- (under object mode) Subdivision - smooth + ctrl 1,2,3
- To fill/ create surface
Select all the edges and press (F)
- To delete the surface
Select the face, right click and delete faces
- To have scaled all 0
Object - apply - all transform (scale, place, all 0)
- To focus on a certain object (/)
- To combine 2 object
Adjust the wireframe, select the objects, object-join, select each edge and press (f)
- Need to have a good-looking wireframe, not only the model
- Put another line/ loop cut to see sharper looks after smoothing it up.
- To separate selection - mesh
- To add thickness - solidify (modifier)
- For transparency
Alpha blend (settings) - adjust alpha
- To have different colour
+ new material - assign

Fig. / Demo, Week 5 (03.05.2023
WEEK 6 / 10.05.2022
Exercise 4: Karambit
Understand Boolean. Boolean modelling techniques and tools.
This week, we learn to model complex objects using boolean operations (union, subtraction, intersection) and creating good topology. (How the components of a mesh are connected to one another)

Fig. / Boonlean, Week 6 (10.05.2023
The purpose:1. Faster to setup complex shape
2. Clean up the wireframe
TUTORIALS
WEEK 2 / 12.04.2022
Mr Kamal makes a robot as the demonstration. In this tutorial, we learn using primitive shapes, mirroring, colouring, and a bit of texture. The shapes we only used were boxes and cylinders.

Fig. / Robot, Week 2 (12.04.2023)
Then I try to make a snowman. I was using a sphere and cylinder only. Then I coloured and give a bit of texture. Then at the end, I put a rabbit ear using a cylinder that had been modified using a simple modifier.

Fig. / Snowman, Week 2 (12.04.2023)
WEEK 3 / 19.04.2022
Mr Kamal started to demonstrate to make a plastic bottle. Here is the reference.

Fig. / Reference, Week 3 (19.04.2023)

We made the bottle from the cylinder. Then we make the N-gon to a triangle or quad (i)Before we started, we can reduce the opacity of our reference.

Fig. / Opacity, Week 3 (19.04.2023)

Fig. / N-gon to quad or triangle, Week 3 (19.04.2023)
We can click all the edges by Alt + click.
Then we create the Bevel.

Fig. / Bevel, Week 3 (19.04.2023)
To select all Ctrl + L
We can put the middle part using a loop cut
Edit mode - Loop cut (Ctrl + R)

Fig. / Loop cut, Week 3 (19.04.2023)
Then we make Extrude region or we also can use Extrude along normal (for cap bottle)

Fig. / Extrude, Week 3 (19.04.2023)
Use Vertex (J) to change N-gon into a triangle/ quad. By selecting the point/ vertex, then press 'J'

Fig. / Vertex, Week 3 (19.04.2023)
To adjust the loop cut, we can use
Edge - Edge slide

Fig. / Edge Slide, Week 3 (19.04.2023)
If want to create a mean crease smooth object
- Bevel
- Loop cut
- Mean crease

Fig. / Mean Crease, Week 3 (19.04.2023)
Then lastly, if want to make the thickness
Modifier - solidify

Fig. / Solidify, Week 3 (19.04.2023)
WEEK 4 / 26.04.2022
Mr Kamal started by reviewing our exercise 1 result. After that, he briefed us about how to consider the shadow and the camera view to look good. Next, he explained to us about exercise 3. It is combined between exercises 1 and 2, combine between box and cylinder. In the tutorial class, we learn 2 new things, mirror modifier and knife tool. Before that, we download the car model first.

Fig. / Car model, Week 4 (25.04.2023)
- Mirror
Cut the other half first - add modifier mirror - axis: x

Fig. / Mirror, Week 4 (25.04.2023)
- Knife: restructure/ rebuild edge loop (K)
To finish: enter
Can use a scale to adjust it to make it straight.

Fig. / Knifer, Week 4 (25.04.2023)
WEEK 5 / 03.05.2022
I thought that this week we will continue to the next exercise or project. But it turns out that still continues exercise 3. In tutorial class, Mr Kamal continues the car demo.


Fig. / Demo1, Week 5 (03.05.2023)

Fig. / Demo1, Week 5 (03.05.2023)

Fig. / Tires, Week 5 (03.05.2023)
WEEK 6 /10.05.2022
After having the feedback section, we 2 demos (boolean and karambit).


Fig. / Boonlean, Week 6 (10.05.2023)
Clean up a wireframe.

Fig. / Wireframe, Week 6 (10.05.2023)


Fig. / Smooth looking, Week 6 (10.05.2023)

Fig. / Karambit Reference, Week 6 (10.05.2023)
Apply the boolean for the cylinder.

Fig. / Boonlean, Week 6 (10.05.2023)

Fig. / Boxes, Week 6 (10.05.2023)
EXERCISES
WEEK 2 / 12.04.2022
- Instructions:
<iframe src="https://drive.google.com/file/d/1-SMTjRuEPxmakuB7v1z0eBI_Vs517BFc/preview" width="640" height="480" allow="autoplay"></iframe>
- Submission procedure:
- Attached the file upon submission (png image format)
- Upload the work on the e-portfolio and put the link in the section
EXERCISE #1
I did sketches for ideas.

Fig. / Sketches, Week 2 (12.04.2023)
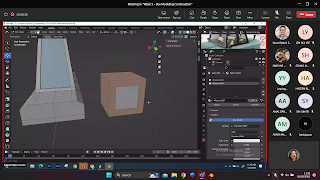
Then in the tutorial class, I ask Mr Kamal if it is possible to do this. Then Mr Kamal taught me how to make the curvy thing for the head of a mushroom.

Fig. / Trying, Week 2 (12.04.2023)
First, we used a cylinder and applied an array and simple modifier, but it didn't come out well (the right side). Then I tried using half sphere and it looks good (two from the right side), but Mr Kamal told me to not use the edit mode first, to focus on object mode. Then he taught me to use a sphere, apply simple modifiers and rigging (add - empty - plain axes) (two from the left side). Then I tried to make again using multiply simple deform and it come out not bad (the left side). I decided to use the last method.

Fig. / Plain Axes, Week 2 (12.04.2023)
Then I tried to make a mushroom using simple deforms and I colour it as well.

Fig. / Mushroom, Week 2 (12.04.2023)
Then because I feel it's too simple, I plan to make a house of mushrooms. Here is my reference.
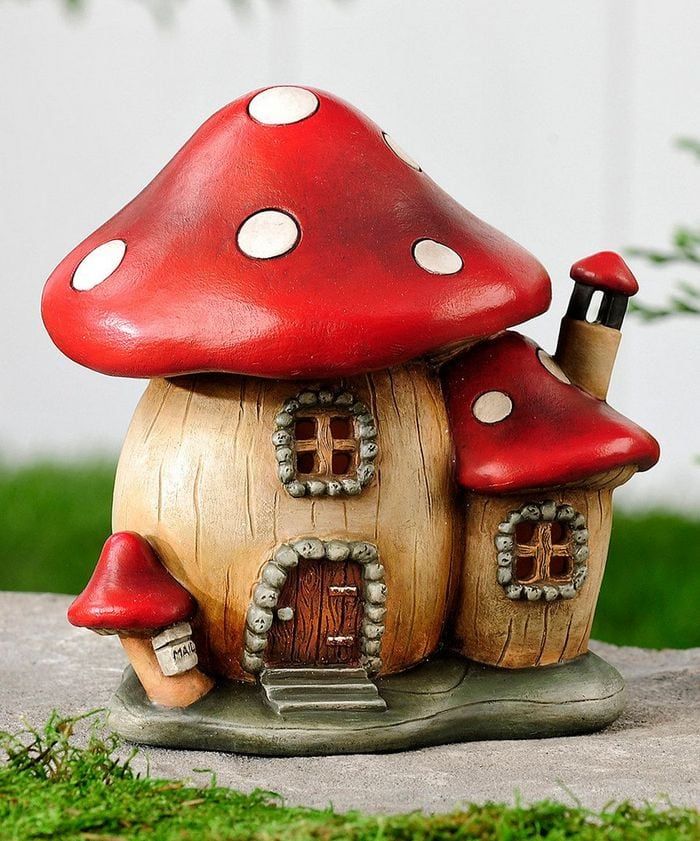
Fig. / Reference, Week 2 (12.04.2023)
Then I tried to model it. Here is my progress.
I make 2 big mushrooms and 2 baby mushrooms.


Fig. / Model, Week 2 (12.04.2023)

Fig. / Colour and Lamp, Week 2 (12.04.2023)

Fig. / Lights, Week 2 (12.04.2023)


Fig. / Result, Week 2 (12.04.2023)
WEEK 3 / 19.04.2022
- Instructions:
<iframe src="https://drive.google.com/file/d/1Ps6HqvJxo8OYX-aUxkwhJSQL5CGnK2JV/preview" width="640" height="480" allow="autoplay"></iframe>
- Submission procedure:
- Attached the file upon submission (png image format)
- Upload the work on the e-portfolio and put the link in the section
EXERCISE #2
First, I'm looking for references.


Fig. / References, Week 3 (23.04.2023)
I make a glass of wine first. I made the inside of the glass as well so that later when I put glass material can see the inside.


Fig. / Wine of glass, Week 3 (25.04.2023)
Then I made one of the decanters. I'm not gonna use all the decanters seeing the time.


Fig. / Decanter, Week 3 (25.04.2023)
Then I made a simple whiskey glass.


Fig. / Glass of Whiskey, Week 3 (25.04.2023)
Last but not least, I made a bottle of wine. I also make the paper label in there.


Fig. / Bottle of Wine, Week 3 (25.04.2023)
I put other supporting objects like the table and the box.

Fig. / Supporting Object, Week 3 (25.04.2023)
Next, it's about the material. For glass material, I need to change from Eeves to cycle first. In shading, add material. Adjust transmission, and roughness, and make it whiter.

Fig. / Transparent Glass, Week 3 (25.04.2023)
For the decanter, the settings are almost the same just I change the colour to red colour.

Fig. / Decanter, Week 3 (25.04.2023)
For the glass of whiskey, I adjust the roughness and the metallic.

Fig. / Glass of Whiskey, Week 3 (25.04.2023)
Lastly, for the bottle of wine, I adjust it not too clear and made it a brown colour.

Fig. / Bottle of Wine, Week 3 (25.04.2023)
Then I render it. It took some time to render it, maybe because I'm using cycles. Here is the result.

Fig. / Result, Week 3 (25.04.2023)
WEEK 4 / 26.04.2022
Before start doing the task, I did some revisions after receiving feedback from Mr Kamal in the class. Here is my revision.

Fig. / Result, Week 3 (25.04.2023)
I change the colour of the land, change the material of the lamp, and make the mushroom looks smoother.
- Instructions:
<iframe src="https://drive.google.com/file/d/1dW6fieiPxX5drij7ipxZ7-VaC6hyteFB/preview" width="640" height="480" allow="autoplay"></iframe>
- Submission procedure:
- Attached is the file upon submission (png image format)
- Upload the work on the e-portfolio and put the link in the section
EXERCISE #3
First, I am looking for a reference first.


Fig. / Reference, Week 4 (26.04.2023)
Then I'm starting modelling part by part. Mostly I used boxes and model them using loop cut, bevel, extrude, and mirroring.
Front view

Fig. / Front View, Week 4 (26.04.2023)

Fig. / Bottom View, Week 4 (26.04.2023)

Fig. / Side View, Week 4 (26.04.2023)

Fig. / Behind View, Week 4 (26.04.2023)

Fig. / Top View, Week 4 (26.04.2023)
Use glass material (transparent) for see through

Fig. / See through View, Week 4 (26.04.2023)
Then I colour it and give the texture or material. Here is the result.

Fig. / Polaroid, Week 4 (26.04.2023)
After rendering, I realised that there is an error in the lens of the camera. I've rendered it the whole night and passed the deadline already. So I decided to revise it after the class.
WEEK 5 / 03.05.2022
During the class, I just realized that I haven't smoothed the object. So I did the first revision during the class. First I tried to apply the loop cut. However, there is a hole already, so the loop cut won't appear. Then I got the idea that I can make it forced by using a knife tool. Then I smoothed it. Then I change the type to eeve. For the glass, I'm using the alpha blend.

Fig. / Wireframe, Week 5 (03.05.2023)

Fig. / Alpha Blend, Week 5 (03.05.2023)

Fig. / Eeve, Week 5 (03.05.2023)

Fig. / Revision 1, Week 5 (03.05.2023)

Fig. / Suggest, Week 5 (03.05.2023)
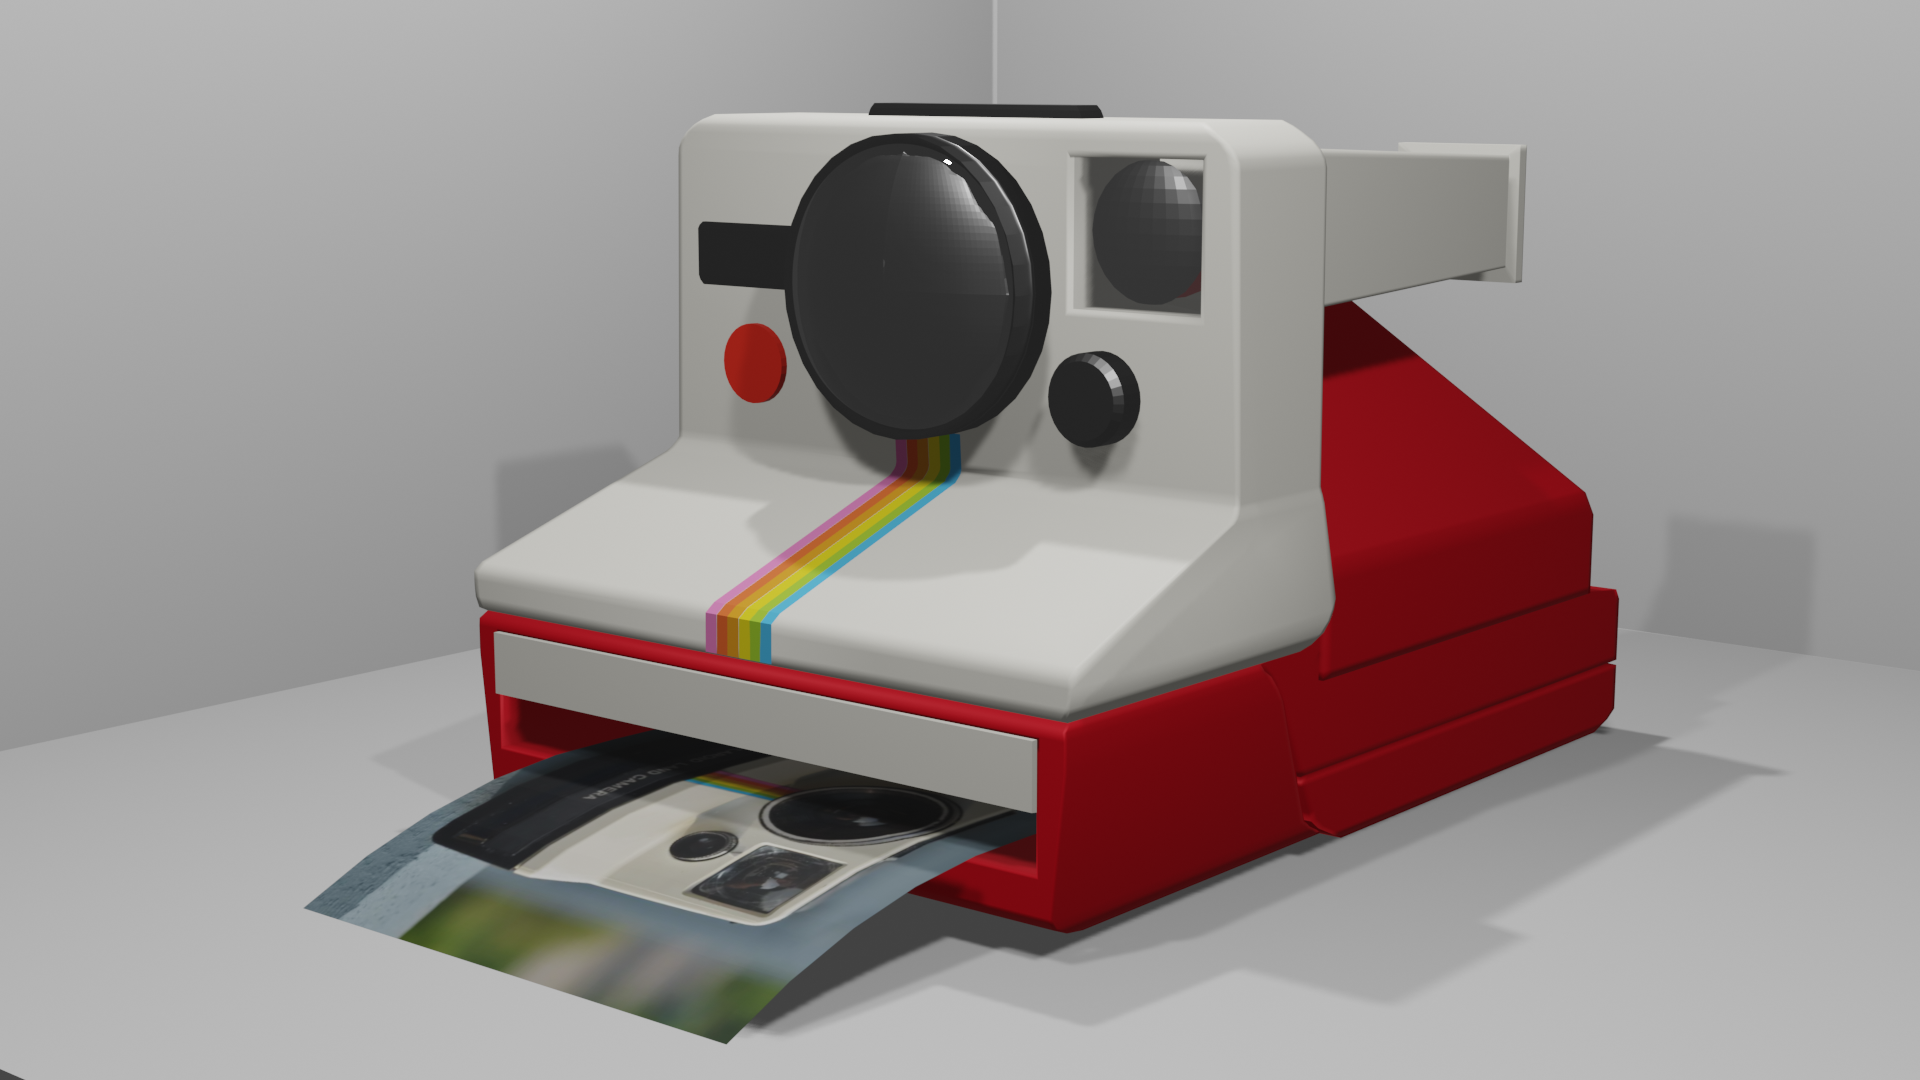
Fig. / Eeves, Week 5 (03.05.2023)

Fig. / Cycle, Week 5 (03.05.2023)
WEEK 6 / 10.05.2022
Before we go into the subject, we have a feedback section first. I did some revisions.

Fig. / Composition and angle, Week 6 (10.05.2023)

Fig. / Put another subject, Week 6 (10.05.2023)

Fig. / Change the blue texture, Week 6 (10.05.2023)
Then I render it.
- Instructions:
<iframe src="https://drive.google.com/file/d/1k-r8wrF8oMsEEHA4hhblHYeNNKd2Eicp/preview" width="640" height="480" allow="autoplay"></iframe>
- Submission procedure:
- Attached is the file upon submission (png image format)
- Upload the work on the e-portfolio and put the link in the section
EXERCISE #4
We made a karambit, continuing from the tutorial class. I made it from boxes, combine with the circle thing, and try to clean up the wireframe.

Fig. / Wireframe, Week 6 (10.05.2023)

Fig. / Smooth, Week 6 (10.05.2023)

Fig. / UnSmooth, Week 6 (10.05.2023)

Fig. / Smooth, Week 6 (10.05.2023)

Fig. / Button, Week 6 (10.05.2023)

Fig. / Combine, Week 6 (10.05.2023)

Fig. / Colour, Week 6 (10.05.2023)

Fig. / Ready to render, Week 6 (10.05.2023)
SUBMISSION
WEEK 2 / 16.04.2022 - Exercise 1
House of Mushrooms.
Fig. / First Attempt Mushroom, Week 2 (12.04.2023)
Fig. / Revision Exercise 1, Week 3 (25.04.2023)
WEEK 3 / 23.04.2022 - Exercise 2
Wine.

Fig. / First Attempt Wine, Week 3 (23.04.2023)

Fig. / Wine, Week 6 (10.05.2023)
WEEK 5 / 03.05.2023 - Exercise 3
Polaroid.

Fig. / First Attempt Polaroid, Week 6 (10.05.2023)
Fig. / Second Attempt Polaroid, Week 6 (10.05.2023)

Fig. / Eeves, Week 7 (17.05.2023)
WEEK 6 / 10.05.2023 - Exercise 4
Karambit.

Fig. / Karambit - Eeve, Week 6 (10.05.2023)
FEEDBACK
WEEK 2 / 12.04.2022
- Don't use edit mode first, focus on the object mode.
WEEK 3 / 19.04.2022
- Don't use black colour solid
- Change the lamp colour so that not the same as the background
- Put thickness on the ground so it doesn't look floating
- Can put smooth instead of flat surface
WEEK 5 / 03.05.2022
- The paper looks too rigid
- The lens can do better
WEEK 6 / 10.05.2022
- Looks good
- Camera angle (zoom, side)
- Balance lacking
- Put a bit of overlap
- Detail looks good
- Nice effort
- Need to pay attention
Balance, nice silhouette, avoided same(?), depth.
WEEK 7 / 17.05.2022
- Looks good
- A bit weird on the edge of the big lens
- Can put smooth on sphere and cylinder
WEEK 9 / 31.05.2022
- Good effort on the black thing
- Looks a bit too sharp
- Can make it simple on the circle thing
- Can put more details on the screw
- Put lighting not on top of the object, but more towards left or right so you can get a nice shadow (3 tones - light, medium, dark)
REFLECTION
Exercise 1 - WEEK 2 / 18.04.2022
I really like my first exercise. I do like making miniature but have never been in digital before. I feel this is interesting. I hope I can do better in Blender because the feature is totally different from other software and it's hard.
Comments
Post a Comment