
01.04.2022 - ?.?.2022 (Week 1 - Week?)
Devina Angeline Wiratama / 0350824
Intercultural Design / Bachelor of Design (Hons) in Creative Media
Final Project
Jump link
LECTURES
Week 1 / 01.04.2022
Today, Ms Anis and Mr Martin, our facilitators, gave us some briefing about the module information booklet (MIB), individual and group set-up on google drive, exercises and projects for individuals and groups. After the briefing, we have to form a group of 5-6 people for the last project. Each group need to select the chapter (1 - Your body or 2 - Family planning) then identify the sensitive information and compile it into slides.
Group 4 - Your Body
Week 1 / 01.07.2022
Before going to the practical, Mr Martin explained to us what is motion graphics. (Source: Google Sheet).

Fig. 1.1 / Motion Graphic Slide, Week 1 (01.07.2022)
Motion Graphics means Graphics in Movement.
Motion Graphics = Composition+Animation.
Composition+Animation
Composition= Graphics+Typography
Animation= Movement+Rhythm
Steps to create motion graphics.
1. Write a script that tells a story.
2. Storyboard While You Brainstorm the Visual Treatment.
3. Take Your Storyboards into Design.
4. Animate the Final Designs.
Remember!
Create Moodboard and Organize inspiration & references
Before going to practical, Mr Martin explained to us what is the difference between motion graphics and animation. (Source: Google Slides).
Animation is images that create an illusion of movement. There are 4 types of Animation:
1. 2D animation.
2. 3D animation.
3. Stop motion animation.
4. Motion graphics.
Motion graphics anatomic.
1. Text Animation: Kinetic Typography
2. Graphic Animation: Graphic elements
3. Chart Visualization
4. Character Animation: Wiggling
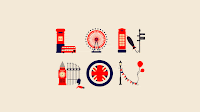

Fig. 1.2 - 1.3 / Motion Graphic, Week 1 (01.11.2022)
Week 3 / 01.20.2022
This week, Mr Martin taught us about Motion Graphic Animation Chart. (Source: Google Slides)
1. Pie Chart and Doughnut Chart
2. Bar Chart
This week, Mr Martin taught us about Motion Graphic Animation Chart. (Source: Google Slides)
1. Pie Chart and Doughnut Chart
2. Bar Chart
3. Line Chart


The key: use the trims path.

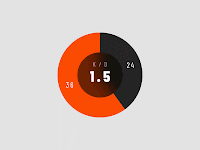
Fig. 1.6 / Trims Path, Week 3 (01.20.2022)A. Pie and Doughnut Chart
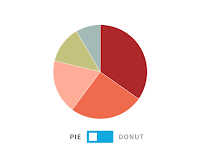
Fig. 1.7 / Pie and Doughnut, Week 3 (01.20.2022)
1. Create Composition
C. Line Chart
Fig. 1.26 / Line Chart, Week 3 (01.20.2022)
1. Create Composition
<iframe src="https://drive.google.com/file/d/1aNAKIMssOygV74v_10mRt1MJU-_f9tul/preview" width="640" height="480" allow="autoplay"></iframe>
Next, Mr Martin taught us about vector/character animations. (Source: Google Slides)
Fig. 1.4 - 1.5 / Motion Graphic Animation Chart, Week 3 (01.20.2022)
The key: use the trims path.
Fig. 1.6 / Trims Path, Week 3 (01.20.2022)
Fig. 1.7 / Pie and Doughnut, Week 3 (01.20.2022)
Select: Mask Tool
→Ellipse Tool
2. Fill Options→None
3. Stoke Options→Solid Colour
4. Hold Shift→Draw circle
2. Fill Options→None
3. Stoke Options→Solid Colour
4. Hold Shift→Draw circle
5. Stroke Colour Option →
Select colour
6. Add → Trim Paths
7. Add keyframes & Easy ease: Trim Paths 1→ End→ 0% & 100%
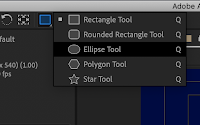
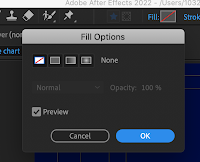
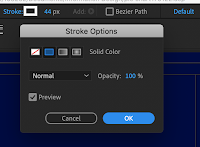
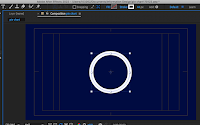
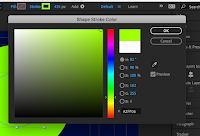
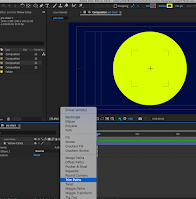

Fig. 1.8 - 1.14 / Pie and Doughnut Chart, Week 3 (01.20.2022)
B. Bar Chart

Fig. 1.15 / Bar Chart, Week 3 (01.20.2022)
7. Add keyframes & Easy ease: Trim Paths 1→ End→ 0% & 100%
Fig. 1.8 - 1.14 / Pie and Doughnut Chart, Week 3 (01.20.2022)
B. Bar Chart
Fig. 1.15 / Bar Chart, Week 3 (01.20.2022)
1. Create Composition
Select: Pen Tool
Select: Pen Tool
2. Fill Options→None
3. Stoke Options→Solid Colour
4. Stroke Colour Options →Select colour
3. Stoke Options→Solid Colour
4. Stroke Colour Options →Select colour
5. Show Proportional Grid
6. Draw vertical line→Increase Stroke Width
7. Add: Trim Paths
8. Add 2 keyframes & Easy ease: : Trim Paths 1→ End→ 0% & 100%
9. Shape→Path 1→Click Reverse Path Direction On
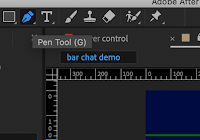

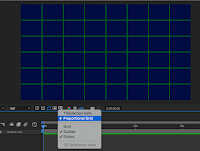
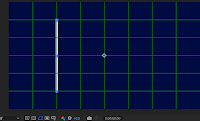
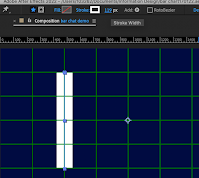
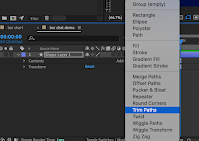
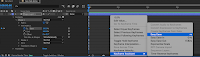
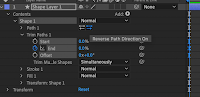
Fig. 1.16 - 1.25 / Bar Chart, Week 3 (01.20.2022)
6. Draw vertical line→Increase Stroke Width
7. Add: Trim Paths
8. Add 2 keyframes & Easy ease: : Trim Paths 1→ End→ 0% & 100%
9. Shape→Path 1→Click Reverse Path Direction On
Fig. 1.16 - 1.25 / Bar Chart, Week 3 (01.20.2022)
Fig. 1.26 / Line Chart, Week 3 (01.20.2022)
1. Create Composition
Select: Pen Tool
2. Fill Options→None
3. Stoke Options→Solid Colour
4. Stroke Colour Options →Select colour
5. Show Proportional Grid
6. Draw the line graph
7. Add: Trim Paths
8. Add 2 keyframes & Easy ease: : Trim Paths 1→ End→ 0% & 100%
9. Repeat the process: Draw a few more lines
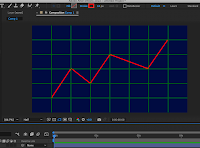
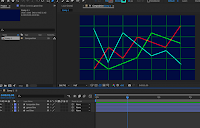
Fig. 1.27 - 1.35 / Line Chart, Week 3 (01.20.2022)
2. Fill Options→None
3. Stoke Options→Solid Colour
4. Stroke Colour Options →Select colour
5. Show Proportional Grid
6. Draw the line graph
7. Add: Trim Paths
8. Add 2 keyframes & Easy ease: : Trim Paths 1→ End→ 0% & 100%
9. Repeat the process: Draw a few more lines
Fig. 1.27 - 1.35 / Line Chart, Week 3 (01.20.2022)
Week 4 / 01.23.2022
Today, Ms Anis explained to us about America's Misinformation Crisis by Tom Patterson.
<iframe src="https://drive.google.com/file/d/1aNAKIMssOygV74v_10mRt1MJU-_f9tul/preview" width="640" height="480" allow="autoplay"></iframe>
Next, Mr Martin taught us about vector/character animations. (Source: Google Slides)
INSTRUCTIONS
<iframe src="https://drive.google.com/file/d/19yxj737a7Sctnv1RJPFXZV24zIBJfAuz/preview" width="640" height="480" allow="autoplay"></iframe>
<iframe src="https://drive.google.com/file/d/19yxj737a7Sctnv1RJPFXZV24zIBJfAuz/preview" width="640" height="480" allow="autoplay"></iframe>
PRACTICAL
Mr Martin gave us tasks, group and individual tasks. Here are the instructions.

Fig. 2.1 / Week 1 Tasks, Week 1 (01.07.2022)
Group
Our group divides the tasks in this your body topic. Some think about the art style, colour theme, animation, google slides, etc. Here is the mood board. (Source: Miro)

Fig. 2.2 / Mood board, Week 1 (01.07.2022)
Here are the google slides. (Source: Google Slides)

Fig. 2.3 / Powerpoint, Week 1 (01.07.2022)
Individual
All the examples of 3 professional motion graphics are on this youtube.
Vid. 2.1 / Motion Graphics, Week 1 (01.07.2022)
3 Professional Motion Graphics:
1. From Harry Styles - Watermelon Sugar.

Fig. 2.4 / Kinetic Typography, Week 1 (01.07.2022)
My first example is from Harry Styles song, watermelon sugar. It is using Kinetic Typography. This motion graphic is very widely used in song lyrics on YouTube. The appearance is very eye-catching compared to just writing without any movement. Maybe it can be said that this model is the most used or the most popular among the others.
2. From Spotify Premium

Fig. 2.5 / Isometric Shapes, Week 1 (01.07.2022)
My second example is from Spotify Premium Ads. It is using Isometric Shapes. I am very interested in this motion graphic. It is really eye-catching and very easy to convey the message without words. For example in this screenshot, you can listen to Spotify Premium while studying. It's really cute. I hope for the final project later I can make something like this.
3. From Kpop girl Aespa

Fig. 2.6 / Glitch, Week 1 (01.07.2022)
My last example is from the teaser video Kpop-girl Aespa. It is using Glitch. I've never seen anything like this before, the combination between real and cartoon and what connects them is the glitch effect. This is an interesting thing. This motion graphic makes changes so subtle that viewers won't be able to tell the difference.
Week 2 / 01.11.2022
We did a refresher on Adobe Effects but only in typography with Mr Martin. He taught us about how to animate the typography like rotation, blur, scale, etc. Next, I learn new things about starts or ends. It is like the animation of each letter/ word down without using separate layers. And we got our task, individual and group task.
1. Kinetic Typography: Word by word
Fig. 3.1 / Word by word, Week 1 (01.07.2022)
In the practical class, Mr Martin teaches us how to make it look like the word for word or letter for letter without arranging one by one. It is interesting and makes more look eye-catching than before. Here is my progress.
Vid 3.1 / Animation Text 1, Week 2 (01.13.2022)
2. Kinetic Typography: Animated paragraph/excerpts

Fig. 3.2 / Animated paragraph, Week 1 (01.07.2022)
In the next practical class, Mr Martin continued teaching about kinetic typography by using the song "So What?" by PINK. Here are what he taught to us.
a. How to use/ change the Size, Leading, Kerning, Align
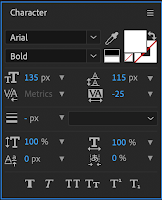
Fig. 3.3 - 3.4 / Typography Settings, Week 2 (01.13.2022)
b. Animate the Position, Scale, Opacity
Fig. 3.5 / Animate, Week 2 (01.13.2022)
c. Keyframing Range Selector→Start 100% →0%, Easy Ease/F9, Graph Editor


Fig. 3.6 - 3.7 / Keyframing, Week 2 (01.13.2022)

Fig. 3.10 - 3.11 / Null Object and Parenting, Week 2 (01.13.2022)
Here is my second progress.
Vid 3.2 / Animation Text 2, Week 2 (01.13.2022)
3. Kinetic Typography: Good Text Animation
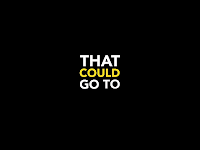
Fig. 3.12 / Good Text, Week 1 (01.07.2022)
Here is my third progress.
Vid 3.3 / Animation Text 3, Week 1 (01.07.2022)
Additional Materials
Individual: Kinetic Typography
Pink song 2 lines animation.
1. Kinetic Typography: Word by word
Fig. 3.1 / Word by word, Week 1 (01.07.2022)
In the practical class, Mr Martin teaches us how to make it look like the word for word or letter for letter without arranging one by one. It is interesting and makes more look eye-catching than before. Here is my progress.
Vid 3.1 / Animation Text 1, Week 2 (01.13.2022)
2. Kinetic Typography: Animated paragraph/excerpts
Fig. 3.2 / Animated paragraph, Week 1 (01.07.2022)
In the next practical class, Mr Martin continued teaching about kinetic typography by using the song "So What?" by PINK. Here are what he taught to us.
a. How to use/ change the Size, Leading, Kerning, Align
Fig. 3.3 - 3.4 / Typography Settings, Week 2 (01.13.2022)
b. Animate the Position, Scale, Opacity
Fig. 3.5 / Animate, Week 2 (01.13.2022)
c. Keyframing Range Selector→Start 100% →0%, Easy Ease/F9, Graph Editor
Fig. 3.6 - 3.7 / Keyframing, Week 2 (01.13.2022)
d. Motion Blur


Fig. 3.8 - 3.9 / Motion Blur, Week 2 (01.13.2022)
f. Null Object and Parenting
Fig. 3.8 - 3.9 / Motion Blur, Week 2 (01.13.2022)
f. Null Object and Parenting
Fig. 3.10 - 3.11 / Null Object and Parenting, Week 2 (01.13.2022)
Here is my second progress.
Vid 3.2 / Animation Text 2, Week 2 (01.13.2022)
3. Kinetic Typography: Good Text Animation
Fig. 3.12 / Good Text, Week 1 (01.07.2022)
Here is my third progress.
Vid 3.3 / Animation Text 3, Week 1 (01.07.2022)
TUESDAY:
https://youtu.be/l1swuCIovtI
https://youtu.be/IJ3QHNQSJg8
https://youtu.be/gJBwE2psOBU
THURSDAY:
https://youtu.be/flEnFIZxLsQ
https://youtu.be/UnK5lGmadSs
https://youtu.be/5sSw50j2ik0
Group: Kinetic Typography
Song lyrics animation on Thursday (20th Jan)
Break Down final project script on Thursday (20th Jan)
Week 2 (01.14.2022)
Group: Kinetic Typography
First, we decided on our song, part of the lyric song, colour theme, and font. We choose "The Chainsmokers & Coldplay - Something Just Like This" as our song. We download the Staatliches font from google font. Here are our colour theme and the lyrics part.
First, we decided on our song, part of the lyric song, colour theme, and font. We choose "The Chainsmokers & Coldplay - Something Just Like This" as our song. We download the Staatliches font from google font. Here are our colour theme and the lyrics part.


Fig. 4.1 - 4.2 / Colour and Lyrics, Week 2 (01.14.2022)

Week 3 / 01.17.2022
My part:
I've been reading books of old
The legends and the myths
The testaments they told
The moon and its eclipse
My part:
I've been reading books of old
The legends and the myths
The testaments they told
The moon and its eclipse
And superman unroll
A suit before he lifts
But I'm not the kind of person that is fits
Today, I do my part on After Effects. I divided the line lyrics into compositions.


A suit before he lifts
But I'm not the kind of person that is fits
Today, I do my part on After Effects. I divided the line lyrics into compositions.


Fig. 5.1 - 5.6 / Progress, Week 3 (01.17.2022)
Vid. 5.1 / My Task, Week 3 (01.17.2022)
And here is my references (my saviour).
Example Kinetic Typography
Text Animators for Beginners - After Effects Type Tutorial
After we do ours's part, we send it to Hussain, our leader to compile the videos.
Week 3 / 01.20.2022
Here are our tasks.

Fig. 6.1 / Week 3 tasks, Week 3 (01.20.2022)
Individual: Motion Graphic Animation Chart
These are my result from the exercise.
Vid. 6.1 - 6.2 / Exercise Pie and Doughnut Chart, Week 3 (01.20.2022)
From this, I got part A (Doughnut Chart) from this source.Here are our tasks.
Fig. 6.1 / Week 3 tasks, Week 3 (01.20.2022)
Individual: Motion Graphic Animation Chart
These are my result from the exercise.
Vid. 6.1 - 6.2 / Exercise Pie and Doughnut Chart, Week 3 (01.20.2022)

Fig. 6.3 / Week 3 task Individu, Week 3 (01.20.2022)
Here is my progress.

Fig. 6.4 / Doughnut Chart Progress, Week 3 (01.20.2022)
Here is my result (Youtube link)
Vid. 6.3 - 6.4 / Doughnut Chart Result, Week 3 (01.20.2022)
Additional Materials
https://youtu.be/vnPT8_k23h0
https://youtu.be/0amv44UwAwg
https://youtu.be/Qs-e-Y4aZ7A
https://youtu.be/EgxGPlNxgtg
Group: Kinetic Typography and Storyboarding
Vid. 6.5 / Final Kinetic Typography, Week 3 (01.20.2022)
Week 4 / 01.23.2022
Each of us does sketches of Your Body. (Source: Script Breakdown)
Here is mine.


Fig. 7.1 - 7.3 / Sketches, Week 4 (01.23.2022)
After that, we insert it on google slides so Mr Martin can see our progress. Next, Mr Martin wanted us to make it on After Effect but still on sketches, just put the arrow of movement. Here it is.


Fig. 7.4 - 7.7 / Week 4 (01.23.2022)
I tried to make a small animation in still images/ sketches on Adobe After Effect. Here is the result.
Vid. 7.1 / Sketch Animation, Week 4 (01.23.2022)
Week 5 / 02.02.2022
After Mr Martin said ok with my sketches, I started to illustrate and animate them. Before that, our group discussed the colour theme, style art, and font. Here are the references for the colour theme.
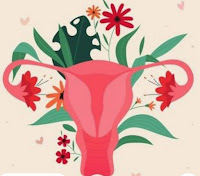

Fig. 8.1 - 8.2 / Colour References, Week 5 (02.02.2022)
Here are the colour theme and the font that we decided on.

Fig. 8.3 - 8.4 / Colour Theme, Week 5 (02.02.2022)
Here is my progress on illustration.

Fig. 8.5 / Progress on Illustration, Week 5 (02.02.2022)
After that, I make a new file for preparing from Adobe Illustration to After Effects. Here is the progress.

Fig. 8.6 / Progress on AI to AE, Week 5 (02.02.2022)
Here are the results in a still image.
Fig. 8.6 / Progress on AI to AE, Week 5 (02.02.2022)
Here are the results in a still image.

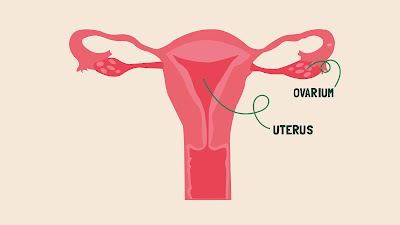


Fig. 8.7 - 8.11 / Result in a Still Image, Week 5 (02.02.2022)
Week 6 / 02.08.2022
After I finished my illustration, I started to animate it on Adobe After Effects. Here is the progress.

Fig. 9.1 / Scene 1, Week 6 (02.08.2022)
I would say, the easiest animation from all of the scenes is on scene 1. The animations are closed eyes, moving her head right-left, and moving her hips.

Fig. 9.2 / Scene 2-4, Week 6 (02.08.2022)
This part is the longest for me to make because there are 3 scenes at once but using the same picture. The major parts of animation are moving eggs from the ovarium, blood coming out, and growing the baby in the uterus.

Fig. 9.3 / Scene 5, Week 6 (02.08.2022)
Last but not least, I would say, the hardest animation from all of the scenes is on scene 5. I need to animate them one by one. There are 8 bubbles, 7 flowers, and 6 plants.
After Mr Martin see this, he said that under the vagina looks like been cut off at the bottom. Since I was already lazy to do it from AI, I repaired it on AE using the puppet tool. Here is the result. For me, it looks natural.

Fig. 9.4 / Revision, Week 6 (02.08.2022)
Here is my first revision.
Fig. 9.4 / Revision, Week 6 (02.08.2022)
Here is my first revision.
Vid. 9.1 / Revision Your Body Video, Week 6 (02.10.2022)
Week 7 / 02.16.2022
Next, Mr Martin said that our group project needs more improvement on the consistency work and also my part and Abigail's part have pixelation problems. Here are the pixelation problems.


Pixelation part: Hips and lines near period.


Pixelation part: Hips and the ovarium illust.
Fig. 10.1 - 10.4 / Pixelation Problems, Week 7 (02.16.2022)
Mr Martin gave us a tutorial from the website on how to Depixelation. Just press the "sun/ star" symbol on After Effect.

Fig. 10.5 / Sun or Star Symbol, Week 7 (02.16.2022)
Next, we try to make more consistent in our every work by giving each other work and picking only one font.

Fig. 10.6 / Share each other works, Week 7 (02.16.2022)
Here is our font.

Fig. 10.7 / Font, Week 7 (02.16.2022)
Here is my video for Your Body. I'm happy with the result.
Vid. 9.2 / My Part - Your Body Video, Week 7 (02.16.2022)
Next, while all of us repaired our parts, Abigail helped us to put the background music and sound effects.
Last but not least, Hussain, our leader, compile all the work. Here is our Final Project Video.
Vid. 9.3 / Final Your Body Video, Week 7 (02.16.2022)
FEEDBACK
Week 3 / 01.17.2022
From my groupmates.
- It's really good.
- I really love the moon and eclipse part
Week 3 / 01.20.2022
From Mr Martin.
- Really good job! I can see there is a constancy in each group's work. I want to see like this great work.
From my groupmates.
- It's really good.
From Mr Martin.

Fig. / Feedback01, Week 6 (02.10.2022)
- Under the vagina illustration, looks like been cut off at the bottom.
- Yeah, it's better now.
From Mr Martin.
- Key points from the consultation:
1. Pixelation issues
2. Inconsistency in Illustrations and font
REFLECTION
The project group this time teaches how to work together in a team. We must unite our opinions and thoughts. There are some difficulties when creating illustrations and animations because each individual has a different type of image which leads to inconsistency of work. Also, there are some such explanations that are not clear enough to make us misinformation sometimes. However, I am grateful that in this group, everyone is working well, willing to contribute and be responsible for each task. Of course, this task requires a lot of struggle. But we managed to achieve that and also taught me that for this semester, we are not concerned with the individual alone.
On the other hand, I also learned a lot of material about After Effect that Mr Martin had taught me through exercises and this final project. I learned the types and also how to make motion graphic animation, kinetic typography, doughnut chart, etc. I am grateful to have followed this module.
On the other hand, I also learned a lot of material about After Effect that Mr Martin had taught me through exercises and this final project. I learned the types and also how to make motion graphic animation, kinetic typography, doughnut chart, etc. I am grateful to have followed this module.
Comments
Post a Comment