
10.25.2021 - ?.?.2021 (Week 10 - Week ?)
Devina Angeline Wiratama /
0350824
Digital Photography and Imaging / Bachelor of Design (Hons) in
Creative Media
Final Project (Project 4): Photoshoot
Jump Link
LECTURES
1. Week 11 (11.01.2021) (Source: Lecture Video Mr Fauzi's PPT)
In this week, we learn about the basics of Digital Photography:
In this week, we learn about the basics of Digital Photography:
- Exposure setting
- Lens perspective
- DSLR vs Smartphone
a. Exposure Setting
Exposure: In photography, exposure is the amount of light that reaches your camera sensor or film.

Fig. 1.1 / Exposure, Week 11 (11.01.2021)
The main parts of the camera:
1. Camera body:
- Shutter
- Image sensor
- LCD screen
2. Camera lens:
- Aperture/ Iris
The camera body is a lightproof box.

Fig. 1.2 / Main Part of Camera, Week 11 (11.01.2021)
Exposure Triangle
1. IRIS
1. IRIS
2. SHUTTER SPEED
3. ISO
There are only two camera settings that affect the actual “luminous exposure” of an image: shutter speed and aperture. The third setting, camera ISO, also affects the brightness of your photos.
3. ISO
There are only two camera settings that affect the actual “luminous exposure” of an image: shutter speed and aperture. The third setting, camera ISO, also affects the brightness of your photos.

Fig. 1.3 / Exposure Triangle, Week 11 (11.01.2021)
1. IRIS: Iris/Aperture controls the flow of light entering the lens. Iris/ Aperture is measured by f-stop, indicated by sequence of f-number: f/1, f/1.4, f/2 , f/ 2.8, f/ 4, f/ 5.6, f/ 8, f/ 11, f/ 16, f/22 , f/32. The lower the f-number, the larger the lens opening.


Fig. 1.4 - 1.5 / Iris, Week 11 (11.01.2021)
2. SHUTTER: The shutter is a small plastic sheet that opens and closes to allow light onto the film or prevent light from reaching the film. Shutter speed is measured in seconds: 1/1000 s,1/500 s,1/250 s,1/125 s,1/60 s,1/30 s,1/15 s,1/8 s,1/4 s,1/2 s,1 s, 2 s, 3 s…


Fig. 1.6 - 1.10 / Shutter Speed, Week 11 (11.01.2021)
3. ISO: Originally referred to the sensitivity of film—its "light gathering" ability. For digital photography, ISO refers to the sensitivity—the signal gain—of the camera's sensor. The common ISO camera settings are: 100, 200, 400, 640, 800, 1600, 3200, 6400…. The lower the number of ISO the less sensitive your camera is to light and the finer the grain.


Fig. 1.11 / Iso, Week 11 (11.01.2021)
Lens Perspective
They are wide-angle lenses, standard lens and tele lenses. The appropriate lens provided desire framing, lens choice affects the angle of view. Different lenses are designed differently for different purposes. Lenses can be categorized by FOCAL LENGTH.


Fig. 1.12 - 1.15. / Lens Perspective, Week 11 (11.01.2021)
Fig. 1.12 - 1.15. / Lens Perspective, Week 11 (11.01.2021)


Fig. 1.16 - 1.17 / Focal Length, Week 11 (11.01.2021)
DEPTH OF FIELD: The proportion of the image that is reasonably sharp and in focus. The smaller the aperture you use, the greater the depth of field.


Fig. 1.18 - 1.19 / Depth of Field, Week 11 (11.01.2021)
Wide-angle lenses are ideal for fitting a large area into your frame. The wide-angle lens is especially useful for landscape photography or street photography. With wide-angle lenses, almost everything is in focus, unless your subject is very close to the lens.

Fig. 1.20 - 1.21 / Wide-angle lenses, Week 11 (11.01.2021)
Standard lenses offer a fairly accurate representation of what the human eye sees, both in terms of visual angle and perspective. Images created by the standard lens are perceived as more natural than those taken with other types of camera lenses.

Fig. 1.22 - 1.23 / Standard lenses, Week 11 (11.01.2021)
Tele lenses are great for isolating a subject that is far away. Tele lenses allow you to photograph subjects from a distance thanks to their magnification.

Fig. 1.24 - 1.25 / Tele lenses, Week 11 (11.01.2021)
DSLR V.S SMARTPHONE
1. Pro
- Familiar with device
- Good quality
- Easy to learn
2. Con
- Still limited
- Good but not great
- Non-ergonomic shape

Fig. 1.26 / Dslr Vs Smartphone, Week 11 (11.01.2021)
DSLR cameras are designed to capture images. Phones are designed to carry out a multitude of functions.
Phone cameras are very limited by size. The size of the lens and the size of the sensor that captures the photos. Entry-level DSLR have much larger lenses and sensors than mobile phones do.
2. Studio Lightning Practice (Source: Mr Martin's PPT)
‘Light has to be understood before you can begin to control the end result in your photography.’-David Bailey (photographer)
To have total control of light, the best studio to work in is a completely black-painted room that has no windows or that can be completely blacked out.
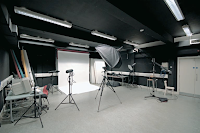
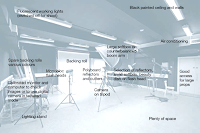
Fig. 2.1 - 2.2 / Studio, Week 11 (11.01.2021)
Fig. 2.1 - 2.2 / Studio, Week 11 (11.01.2021)
Studio lighting is not just a whim or fancy but is used to reveal – sometimes to conceal – line, shape, form, space, texture, light and colour. These are the formal elements of composition. The photographer starts with no light at all and has to previsualize how to light the subject matter and what effect the light will have upon the subject.


Fig. 2.3 - 2.5 / Lighting, Week 11 (11.01.2021)
This requires knowledge, craft, observation, organisation and discipline. Good studio photography takes time, lots of time, and patience.
a. Continuous light: Continuous light is lighting that is on all the time. What you see in front of you in the studio is what you photograph. For this reason alone, it is often favoured by those starting out.
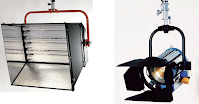
Fig. 2.6 / Continuous Light, Week 11 (11.01.2021)
a. Continuous light: Continuous light is lighting that is on all the time. What you see in front of you in the studio is what you photograph. For this reason alone, it is often favoured by those starting out.
Fig. 2.6 / Continuous Light, Week 11 (11.01.2021)
b. Flash: A modern flashgun is a most versatile light source; powerful yet lightweight. Their light can be bounced or diffused just like any other light and electronic flash is balanced at daylight colour temperature.
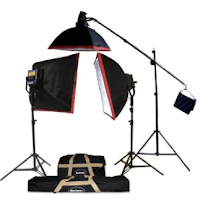
Fig. 2.7 / Flash, Week 11 (11.01.2021)
Fig. 2.7 / Flash, Week 11 (11.01.2021)
Portrait Lighting Setup

Fig. 2.8 / Lighting Setup, Week 11 (11.01.2021)
Side Lighting: With a side-lit photograph one side of your subject’s body will be illuminated while the other side may be in total darkness.


Fig. 2.9 - 2.12 / Side Lighting, Week 11 (11.01.2021)
Rembrandt Lighting: Classical lighting style by a triangular highlight on the cheek. The main light is placed to the side of the subject and angled down from about two feet above the subject’s head.

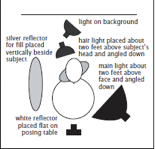


Fig. 2.13 - 2. / Rembrandt Lighting, Week 11 (11.01.2021)
TUTORIAL
Week 11 (11.01.2021)
DEMO
- Lighting in Photography
Photography Lighting practise was conducted in the campus photo studio. We can watch it through Facebook. However, it is not available due to online+lockdown. We will be invited to a lighting workshop after we are all back on campus, most likely in 2022.
Here are some great videos we recommended for a new learner to explore the lighting technic:
Use your camera/phone to take the below images (standard lens/ portrait mode):
1. Full body shot of you.
2. Half body of you.
INSTRUCTIONS
<iframe src="https://drive.google.com/file/d/1KzzNSVxa0kKS--SV78TKxs6WRnUGRU4z/preview" width="640" height="480" allow="autoplay"></iframe>
PRACTICAL
Week 11 (11.01.2021)
This week, we are briefed about our last project, which is Self-Titled. Below is the reference and sample of the PROJECT 4: Self-Titled
This week, we are briefed about our last project, which is Self-Titled. Below is the reference and sample of the PROJECT 4: Self-Titled
Project 4 / Self - Titled (Source: Mr Fauzi's PPT)
Next, we were asked to fill in the Idea Development and Design Direction. Here is some progress.
1. Idea Development


Fig. 3.1 - 3.3 / Idea Development, Week 11 (11.01.2021)
2. Design Direction
Vid. 3.1 / Progress, Week 11 (11.01.2021)
Here are the sketches.


Fig. 3.4 - 3.5 / Sketches, Week 11 (11.01.2021)
Self-titled is an exploration project for the students to express their own individuality and reflect their personality into digital art self-expression. The main idea is to build up self-confidence and discover their interest.
Next, we were asked to fill in the Idea Development and Design Direction. Here is some progress.
1. Idea Development
- Write a biography about yourself
- Write a statement about your work
Fig. 3.1 - 3.3 / Idea Development, Week 11 (11.01.2021)
- Create a sketch for your work.
- Create a digital poster for your work (in Week 12)
Here's the progress
Vid. 3.1 / Progress, Week 11 (11.01.2021)
Fig. 3.4 - 3.5 / Sketches, Week 11 (11.01.2021)
FEEDBACK
Week 12 (11.08.2021)
I like your sketches, you may start to take a photoshoot and digitalize them.
I like your sketches, you may start to take a photoshoot and digitalize them.
REFLECTION
At first, it was a bit difficult to find ideas, but because of the help from the translation of ideas in Ideas Development, it really helped me in thinking about how the results would be. Starting from biography, motto/quote, poster references, and also sketches. This week, Mr Fauzi also emphasized to all of us that the most important thing is not the animation, but the photography.
Comments
Post a Comment